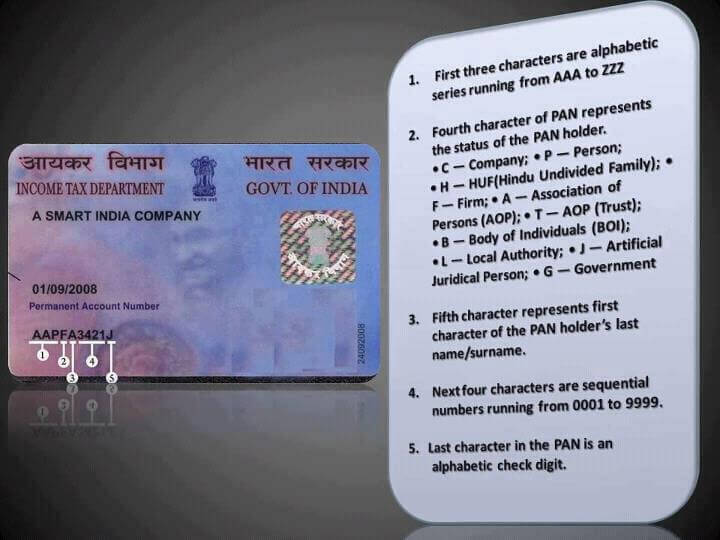
Like Facebook Page
Random Posts
Change Language
eWebBuddy Recommends
Popular Posts
Vote Here
Loading ...
eWebBuddy SMS Updates

I came across a very interesting post via mint.com today and thought its really worth spreading and sharing. This blog post will help you understand how to crack the number mentioned on your credit cards. What they mean and how you can find out whether a credit card number is valid or fake. Interesting right?
byJess.Net has explained the process with the help of an illustration very clearly. So grab a calculator or use your skills of mental mathematics and dive in. Know more about that credit card you use every day for various shopping trips. Also the information will come very handy for developers who want to check a credit card number’s validity while processing online payments.
Now only with the code you can find out whether you have an Amex, Visa, MasterCard or Discover. Along with industry and other details. To know more about Luhn Algorith – click here.

On 16th July’2010, Indian Rupee joined the elite group of currencies which have their own symbol. This symbol has been designed by Bombay IIT Post-Graduate B. Udaya Kumar. Though the symbol has already had many explanations, everyone has accepted it with open arms.
Now that the symbol is out and you can start using it, the trouble comes as to how you can type it? Where all other currencies have this fixed, it will take a while for the Indian Currency to come with a dedicated key with the symbol on keyboards. But does not mean you cannot use it. ![]()
A new font designed by Foradian Technologies has been released which can be used to get this font. The steps to install the font are:
That’s all it takes. Use the symbol where-ever you want, its just a key away. ![]()
In case you face any issues with versions or OS, consult this link.

So, how many of my friends use wordpress here? WordPress today being the most preferable and popular platform of all the blogging platforms, it would not be surprising if the numbers are quite steep. ![]()
But then the question that comes up is how many have you taken steps to ensure that your WordPress blog is secure?? I can see a lot of doubt on your face but worry not, this post will guide you to improve your security.
A recent event triggered this thought in my mind that I should check my WordPress security. If you might have noticed in the past couple of days, ewebbuddy was throwing a Database not Available error though I could not find
anything wrong in my database. Recently I had upgraded my WP installation and I was worried that it might have been a result of some security loophole in which case I had to clean my installation and install everything back. The process is tedious but I couldn’t think of a better alternative. Thankfully I had backup of all the posts, so I was not afraid of losing any data. But further probing told me that it wasn’t a security issue but actually a issue due to certain changes made on the Cpanel by my host lunarpages. I was glad that the issue could be resolved but it got me thinking that is my blog secure enough?! And I took steps to ensure it is.
Here I have list down some of simplest things that you should check to improve your WP security:
To know more and know it detail, check out the following post – Hardening WordPress
Here are a couple of plugins that I have tested and found quite helpful in making your WP installation secure.
There are more plugins which might prove helpful but I have found that these basic ones make your installation quite strong and secure.
Hope you find this post helpful and make your installation secure. In case you have further tips, plugins do share them below.
Goood Day…!!
Sharing internet over Wi-fi has become quite popular now a days. Since service providers themselves are providing Wi-fi routers, accessing internet on multiple devices such as laptops, PDAs, mobile phones with a single internet connection has become very easy.
But if you have a normal broadband connection and want to create your own wireless network for sharing internet, either you can buy a Wi-Fi router which costs around 2500 INR or use the Windows 7′s Wireless Hosted Network (Virtual Wi-fi) technology which will turn your Windows 7 Laptop in to a Wi-Fi hotspot without any additional hardware. If you want to share internet with a desktop that doesn’t support Wi-Fi, you can get a USB Wi-Fi adapter or a PCI Wireless network card.
If you are wondering what a Wi-Fi Hotspot is, well it is simply put a device that enables users to access internet over wireless LAN. Now how do we set up our Windows 7 machine to act like a Wi-Fi Hotspot? Well actually there are couple of ways to do it.
Windows 7 comes with a feature called Ad-hoc network (This was available on Windows Vista also), using which you can share internet with another device. I tried the same but did not feel it to be quite impressive. Here is a youtube video which explains how to do it.
Better and easier way is to use a tool called Called Connectify Me

With Connectify me all you need to do is just follow a simple wizard which will ask you a Network Name, a Password for the wireless network and the connection you would like to share.
Once you are done with the wizard, you can start the hotspot by clicking on Start Hotspot, which will make the network available for other devices. Just scan for the wireless network on another device, key in the password and you are done.
Connectify sits on your system tray and displays the number of clients connected to the network. Now starting and stopping the wireless network is just a click of button. Connectify also enables local sharing such as file sharing. All your shared folders will be available on the network, all you need to do is enter your windows login id and password to access your files wirelessly on another device.
This was a simple click and go method, but if you are interested in exploring more read on.
If you wanted more features and wanted to change the functionality of the sharing then there is more for you.
There is a Open Source tool called Virtual Router on codeplex, which is entirely developed in C# 3.5 with WPF. Now comes the real fun, just download the code and create your own version of the Virtual Router…! You can go ahead and add a module to limit the internet bandwidth shared on the wireless network. You can add a module which logs all the URLs browsed on the wireless network for each connection, in case if you are planning to use it in an office environment, this will be helpful.
I tried both Connectify Me and Virtual Router from My Windows 7 laptop and could access internet on other devices such as another laptop, an iPhone, a blackberry mobile without any hiccups.
This is a guest post by my friend and another techie, Amitkumar Hegde.

This is a kickstart to one of the sections I wanted to start long time back – BuddyQuery. This category will have answers to the simplest and smallest of Tech troubles. All you have to do is post the query in the “Skribit” box in the sidebar!
In this post we will talk about how you can Download videos from YouTube the easy way. I will not be talking about various softwares that you will need to download. The solutions present in this post are direct, online and ready to use. 
Please find some of the methods that you can use below:
1. Keepvid.com – This is one of the first websites that came up and has been my favorite ever since. Its quite simple and gives you the choice of downloading the videos in either .flv or .mp4 formats.
2. Download directly – This option lets you download your video directly from address bar without going to any website. What more, you can download in the format you desire viz. flv, 3gp or mp4. Find the steps below:
Suppose you want to download following video:
http://www.youtube.com/watch?v=P5ya0dehxms
Then after adding the OK the url will be like this
http://www.OKyoutube.com/watch?v=P5ya0dehxms – Will download it in FLV format.
If you want to download video in 3GP format then the url will be:
http://www.3.OKyoutube.com/watch?v=P5ya0dehxms
If you want to download video in MP4 format then the url will be:
http://www.4.OKyoutube.com/watch?v=P5ya0dehxms
Pretty neat, huh??
Apart from the above mentioned 2 methods there are several more similar sites and options. But why hunt for more when you know the best? ![]()
So get going and get all those videos you love on your desktop. Subscribe to eWebBuddy if you still haven’t for more such tips.
Do leave a comment and let me know if this post was useful!
Sorry, there are no polls available at the moment.
From the moment Google Buzz was launched, it has created quite a BUZZ.. Have you jumped the bandwagon yet? To me it seemed initial stages of how wave will be integrated with GMail. And frankly I wasn’t much impressed but that could be just me. What did you think about Google Buzz?
Well, coming back to the agenda of this post…if you have been using buzz and connecting to several of your friends one thing that must have irritated you are the Google Buzz Updates that you receive in your Inbox. Well if you have been looking for a work-around, here’s a trick that will come handy.


That’s all, from the moment you do this, you will stop getting Google Buzz updates in your Inbox and this way it will be un-cluttered.
You can also stop using buzz totally with the help of a small link at the footer/bottom of your gmail account. It says, “Turn off Buzz”. Get rid of Buzz totally! ![]()
Hope this post was helpful, do leave a comment on what you think. That would mean a lot to me. Also, popularize this post by tweeting it, or sharing on facebook or stumbling or whatever you like.
Subscribe to the RSS feed if you haven’t yet and get more such useful tips and tricks in future.
Page optimized by WP Minify WordPress Plugin